|
...Continued from Page 14.

The Button Gallery. |
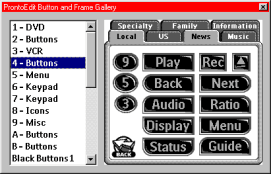
But the easiest way to manage button styles is through the "Gallery". The gallery is a floating window that can contain any number of pages, each of which can be filled with buttons. These buttons can feature predefined bitmaps, colors, labels and basic command structures. To add a new button, just drag it off the gallery and onto a panel. Custom galleries can be created by opening the "gallery.ccf" file, located under the base ProntoEdit directory. In addition, default layouts for new home, device or macro panels can be modified by editing "home.ccf", "device.ccf" and "macro.ccf" respectively. A blank panel can be added instead of the default design by holding the [SHIFT] key while selecting the command.
Right-clicking over a device name on the tree provides options to move, cut, copy or delete a device, add a panel, add a new device, rename the device, or set one of several special functions. Those functions are "Is Template", which means the device will only be accessible from the "Add new device" option on the basic remote; "Is Read Only", meaning that it can't be changed on the remote; "Has Separator", to draw a line above the device on the Device Menu; and "Needs Programming", a new option that is used to tell the remote that the device needs a preprogrammed code set. Devices, or "Groups" under the Macro section feature similar functions and design considerations (indeed most users either ignore the whole Macro section or use it for different, non-macro purposes), however it's special options include the ability to make a group specifically for timers. That way, any blank buttons you add under such a group will default to a timer, instead of a macro, when it's edited on the remote.
Right-clicking over a panel name presents similar options, except here the only special function is "Is Hidden". That moniker is actually somewhat of a misnomer as it only prevents the remote from scrolling that panel. If an entire device is made up of such panels, the first panel will still be displayed when the device is selected, but no scroll icons will appear on the side of the screen to get to other panels - that functionality must be designed into your custom layout using page jumps. For close-up work, each panel can be zoomed up to four times its' original size. In addition, custom layout grids can be created and displayed at any time, along with a selectable "snap-to" option.

The ProntoEmulator. |
Full Emulation… and more.
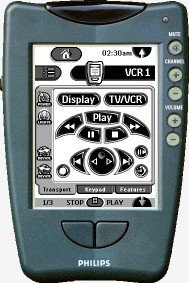
One of ProntoEdit's most useful utilities is the ProntoEmulator. Complete with a picture of the remote and operational hard buttons, the emulator uses the same program code as the real remote and will show you exactly how your configuration works - or doesn't. If you've got a Pronto connected to the computer (and ProntoEdit feels like cooperating) buttons pressed on the emulator will be transmitted out the real remote.
Since ProntoEdit .CCF files (CCF stands for "Cabernet Configuration Files", "Cabernet" being the development codename for the Pronto) contain everything needed for a configuration - layouts, bitmaps, macros and infrared codes - they are ideally suited for sharing over the Internet. Hundreds of uploaded systems and thousands of devices can't be wrong! ProntoEdit is fully capable of saving multiple files, however it isn't capable of having more than one file open at a time. Files can be merged into another, but panels or devices from one can't be quickly copied to the next. As ProntoEdit doesn't use the Windows clipboard, two open sessions of ProntoEdit aren't aware of each other and nothing can be copied between them. Luckily, the ProntoEdit clipboard maintains its contents between multiple files, so it is possible to swap data via that method.
| 
